Large Volume Press Instructions
Last updated 10/30/98 by Yanbin Wang and 10/31/98 by MTV
To operate the LVP, three separate programs need to be run. All the beamline and press controls run use MEDM. The program used for scanning is called the DATA CATCHER, which runs under IDL. The AIM Multichannel Analyzer is also used with an IDL program called MCA. All of these programs are tied together using EPICS.
In principle, all these programs can run either locally on the NT Workstation (LeBaron), or on the Unix Server (CORVETTE) using LeBaron as an X-windows workstation. At the time of this writing, both IDL programs run on CORVETTE, and the MEDM program runs on LeBaron. Addendum (MTV) the MCA program now runs best on LeBaron; the Data Catcher will run on LeBaron, but still has some bugs, so use Corvette.
Table of Contents:
1. MEDM
: To run all beamline motion controls
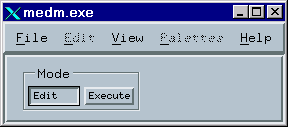
Choose Start > Programs > EPICS WIN32 Extensions in the Start menu of LeBaron. You’ll get the following popup window:
Click File, and Open the file named 13BMD.adl
This will open the main control window called 13BMD.adl:
13BMD.adl
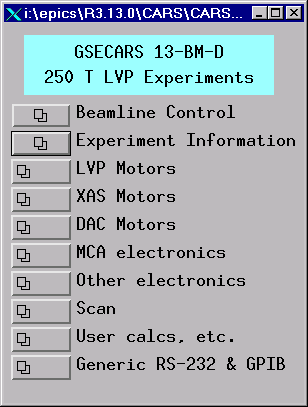
Be sure to select Execute button in the MEDM.EXE popup!! Select each field by dragging the mouse in the corresponding button. Keep the left mouse button pressed when going to the next level of selections. The buttons will allow you to control various components of the LVP setup:
![]() Beamline Control: beam status, equipment protection system (EPS) status, beamline slits (in BM-A and BM-D) etc.
Beamline Control: beam status, equipment protection system (EPS) status, beamline slits (in BM-A and BM-D) etc.
![]() Experiment Information: Allows you to enter specific information on the particular run (the info will be saved in the MCA file, so remember to upgrade the information relevant to each particular spectrum).
Experiment Information: Allows you to enter specific information on the particular run (the info will be saved in the MCA file, so remember to upgrade the information relevant to each particular spectrum).
![]() LVP Motors: essentially ALL motors for LVP operation
LVP Motors: essentially ALL motors for LVP operation
![]() XAS Motors: not used for LVP
XAS Motors: not used for LVP
![]() DAC Motors: not used for LVP
DAC Motors: not used for LVP
![]() MCA electronics: electronics for the multi-channel analyzer (MCA). Canberra amplifier, A to D converter (ADC), etc.
MCA electronics: electronics for the multi-channel analyzer (MCA). Canberra amplifier, A to D converter (ADC), etc.
![]() Other electronics: Stanford Research Systems (SRS) preamps (# 2 is used for photo diode input and output); Scaler (used for clock and photo diode readings); Keithley (used for logging in ram position LVDT, pressure, temperature, heater cureent, voltage, thermocouple emfs, etc.); Digital-analog converter (DAC; used for controlling heating power supply).
Other electronics: Stanford Research Systems (SRS) preamps (# 2 is used for photo diode input and output); Scaler (used for clock and photo diode readings); Keithley (used for logging in ram position LVDT, pressure, temperature, heater cureent, voltage, thermocouple emfs, etc.); Digital-analog converter (DAC; used for controlling heating power supply).
![]() Scan: used for scanning any positioners (a motor, a cmpound motor, or anything that can be "moved").
Scan: used for scanning any positioners (a motor, a cmpound motor, or anything that can be "moved").
1.1. Beamline Control
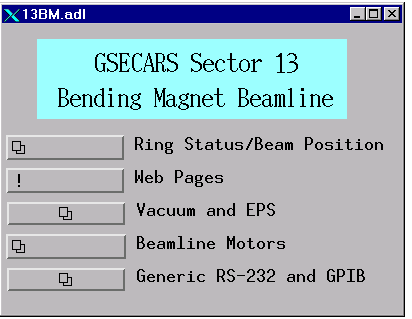
Ring Status/Beam Position
![]()
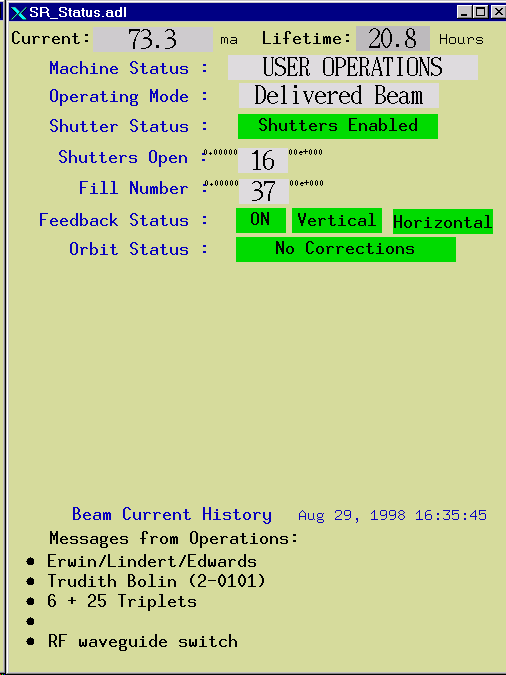
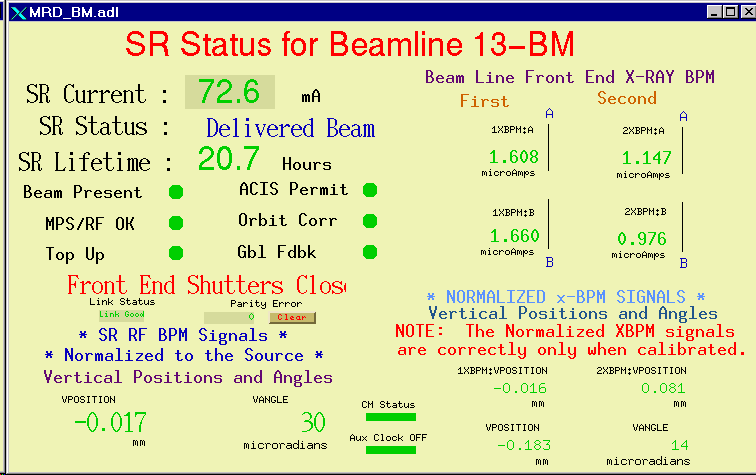
Storage Ring Status [SR_Statis/adl]
13-BM Beam Position Monitors [MRD_BM.adl]
Web Pages
![]()
Vacuum and EPS
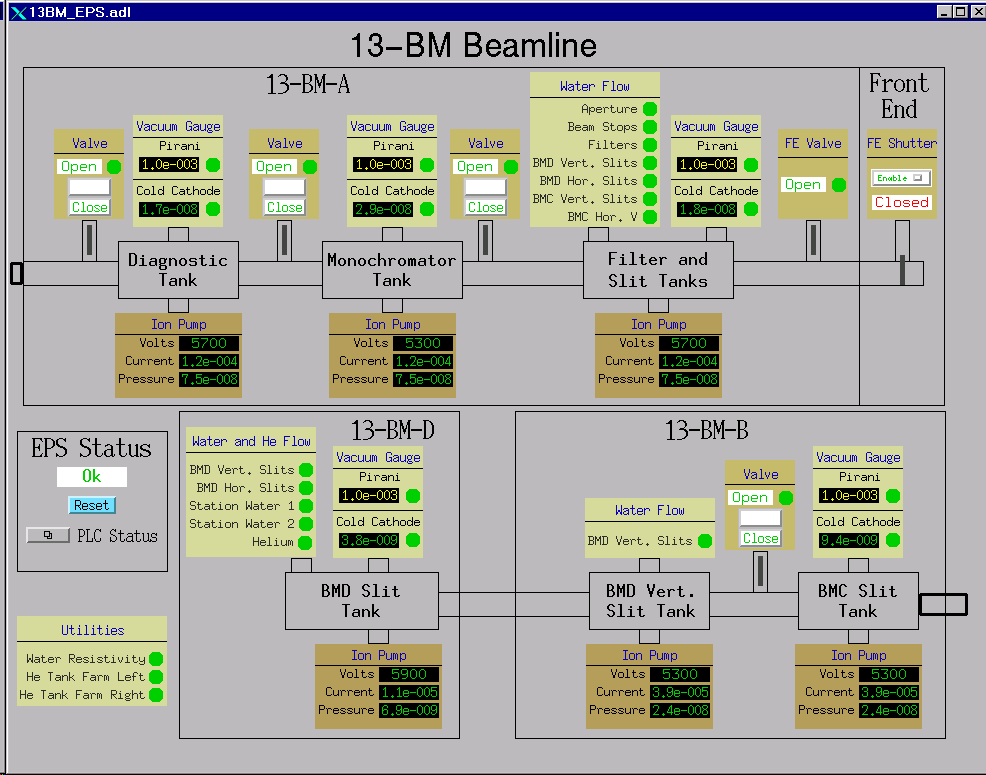
The green dots will become red when any equipment protection system (EPS) fails and the beam will be disabled.
Report any faults to Yanbin.
Beamline Motors
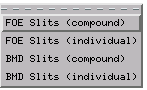
FOE Slits (compound) [4slitGraphic.adl]
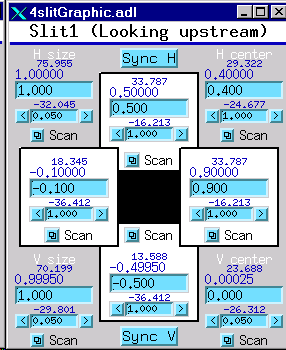
Controls beam size and position using the slits in 13-BM-A (first optics enclosure or FOE). Use this record instead of the "individual" motor record (below) for motor controls.
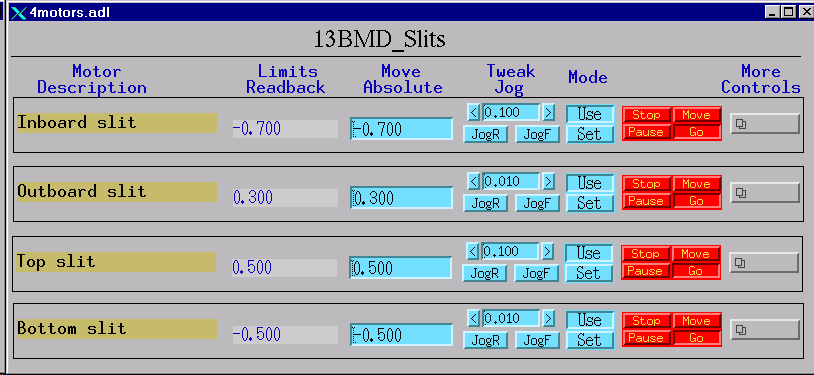
FOE Slits (individual) [4motors.adl]

BMD Slits (compound) [4slitGraphic.adl]
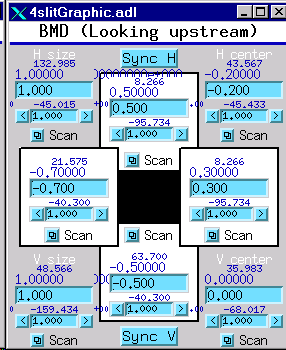
Controls beam size and position using slits in the slit tank at 13-BM-D (the upstream tank). Use this record instead of the "individual" motor record (below) for motor controls.
BMD Slits (individual)
1.2 Experiment Information
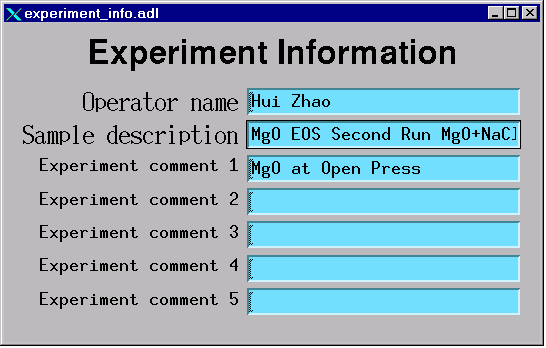
Note: If this data file is converted to SAM85 format, the Sample Description line will be come the first header, and the five Experiment comments will be concatenated to become the second header. Place all changeable information in Experiment comment 1, so that it will be at the beginning of the line. These two lines are printed on the PLOT85 graphs. Each line can hold up to 40 characters.
1.3. Motors
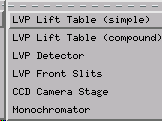
For controls of LVP positions, choose LVP Lift Table. You have two choices: compound and simple. ALWAYS USE THE COMPOUND VERSION FOR EXPERIMENTAL CONTROL!
LVP lift table (simple) [6motors.adl]
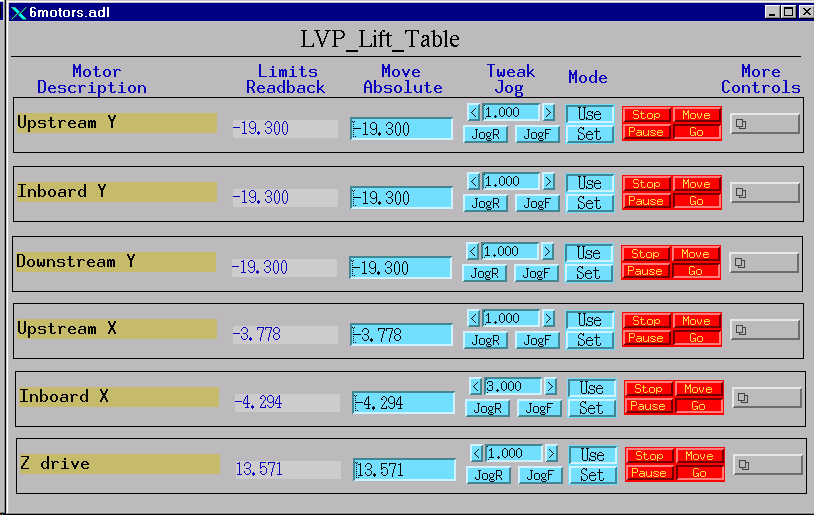
This record gives positions of individual motors for the LVP lift table. Because both linear translation and rotation of the press require multiple motors, in actual control you need to run using the compound record.
LVP lift table (compound) [LVPtable.adl]
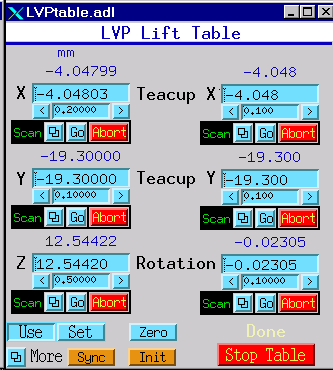
Click "more" for geometry description:
.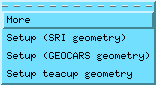
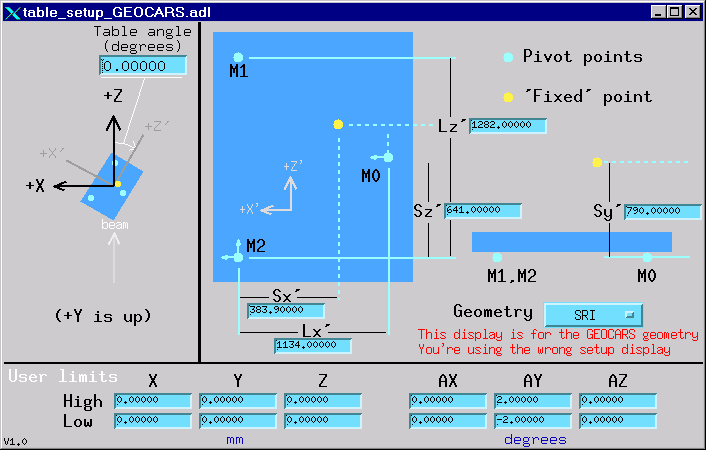
To check geometry set up, choose "Setup (GEOCARS geometry)". Note we are using the GSECARS geometry:
To set up T-Cup geometry, choose "Setup teacup geometry":
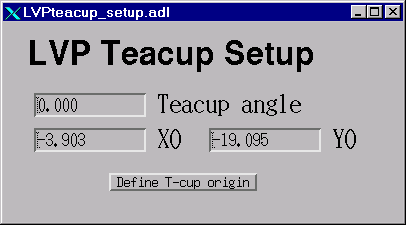
In T-Cup setup, make sure the "Teacup angle" is at 35.2644 degrees for T-Cup operation. You can set up T-Cup origin at any time during the experiment. A good practice is after you have centered the sample using the LVP lift table (compound), set that point as T-Cup origin, so you can scan in the T-Cup X and Y directions.
LVP detector [LVP_detector.adl]
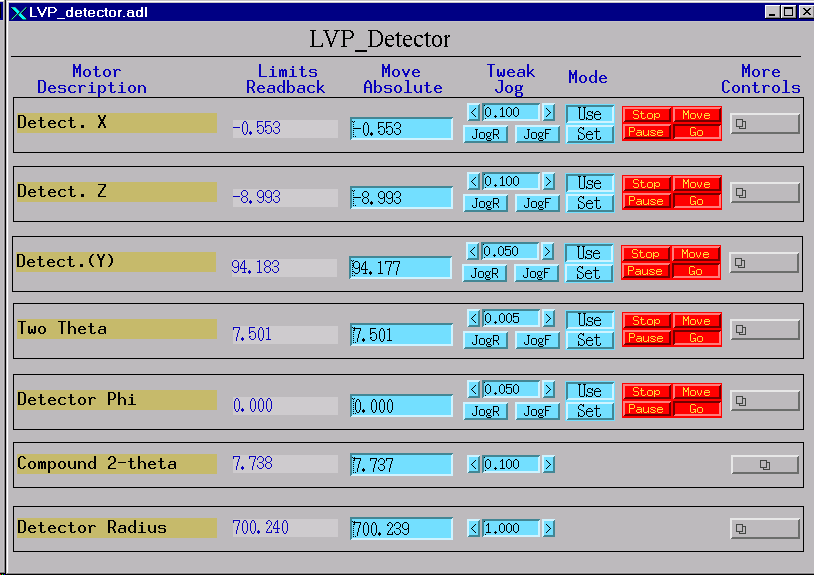
This record controls positions of the detector. In DIA mode, Detector Phi must be zero. For T-Cup mode, the true two theta angle is decomposed into two angles, Two Theta and Detector Phi. Only Compound 2-theta will give you the true value.
Click on the far right button for Compound 2-theta, to open the following window:
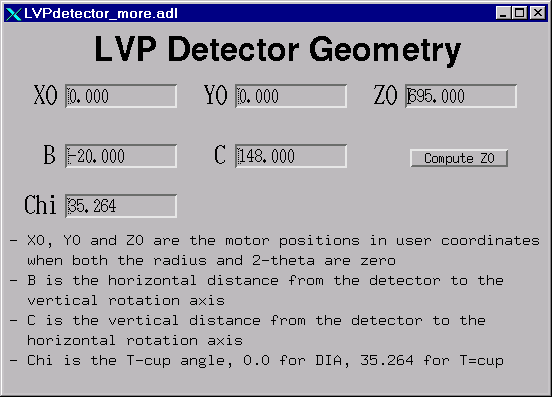
Be sure that the Chi angle is set at 35.264 degrees. The Parameters for Z0, B, and C should be set as above.
More
All
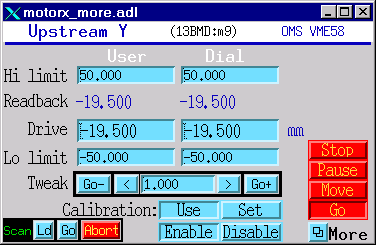
Gives all the information about driving this motor.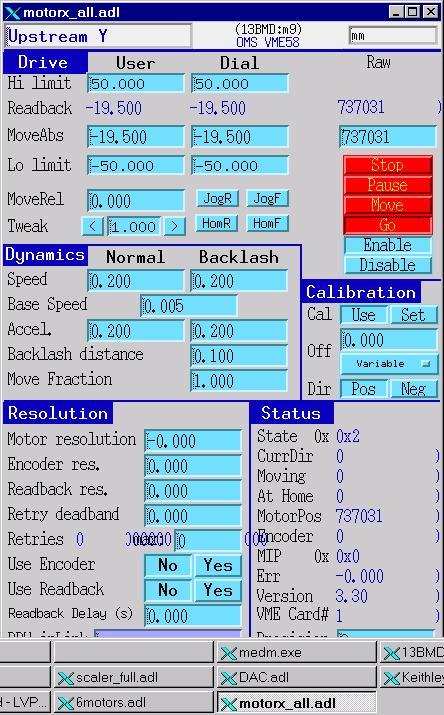
Scan Parameters
Helps load scan parameters for this motor to the scan record.
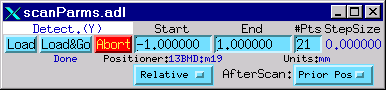
Typically, use "Relative" and select "Prior Pos" so the motor will return to its position before the scan. Choose range by giving start and end points, and step size by giving number of points. Click "Load" to load the parameters to the scan record.
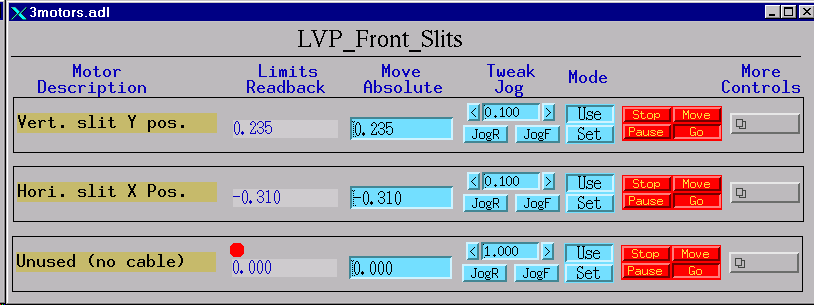
LVP front slits [3motors.adl]
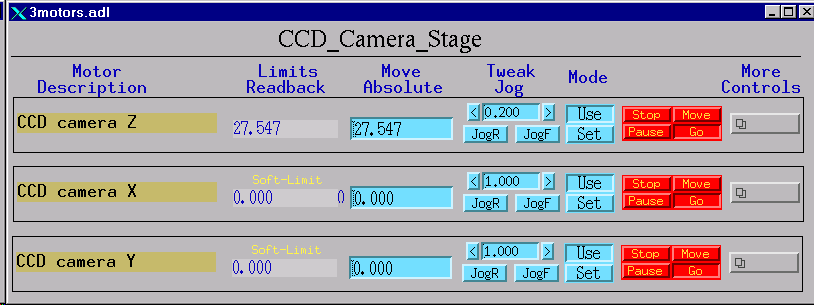
CCD camera stage [3motors.adl]
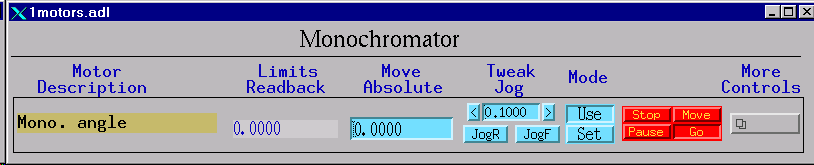
monochromator [1motors.adl]
1.4 MCA Electronics
Note: this is NOT used for collecting data from the MCA, but to set up the electronics.
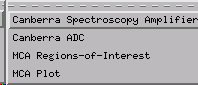
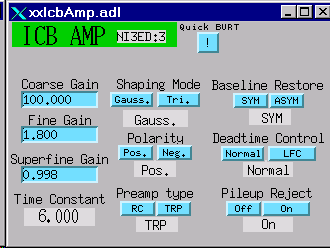
Canberra Spectroscopy Amplifier [xxlcbAmp.adl]
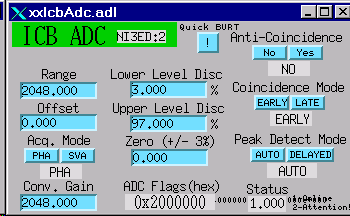
Canberra ADC [xxclbAdc.adl]
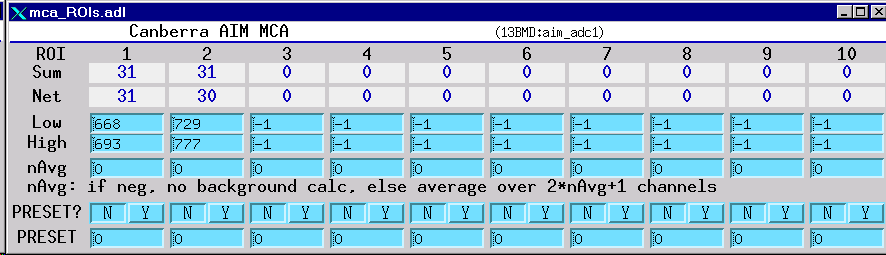
MCA Regions of Interest [mca_ROIs.adl]
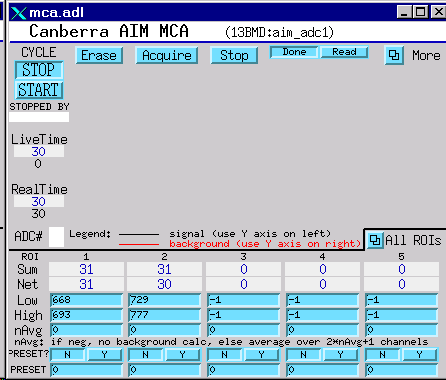
MCA Plot [mca.adl]
1.5 Other Electronics
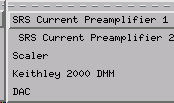
SRS Current preamplifier 2 is for the photo diode (beam intensity monitor),
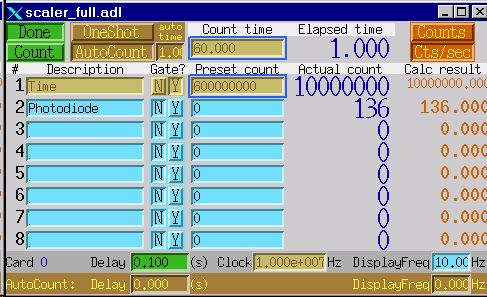
Scaler for clock and photo diode readings,
Keithley 2000 DMM for logging voltage, current, thermocouple, LVDT, pressure, etc. information.
DAC for sending control signal (0-10 VDC) to the power supply for heating.
SRS current preamplifier 1 [SR570.adl]
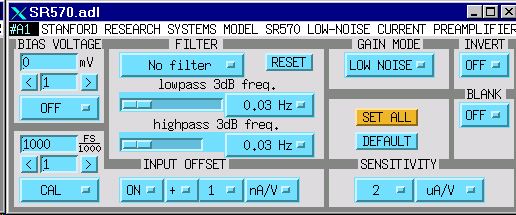
SRS current preamplifier 2 [SR570.adl]
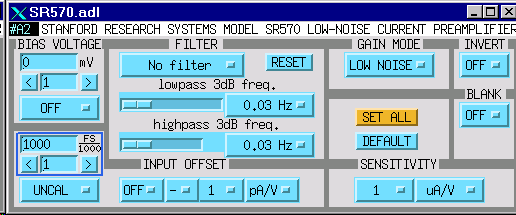
You can change the settings on the SRS preamps remotely by clicking these buttons. Especially, if the photo diode readings are around 640,000, it means it is saturated. You should (1) reduce the beam, and (2) change the sensitivity (say, from nA to microA).
Scaler [scaler_full.adl]
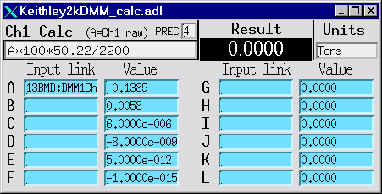
Kiethley 2000 DMM
First click on Keithely 2000 DMM will bring you to the following window:
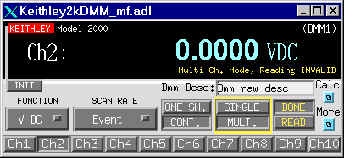
Click on "More" and select "Multi-channel screen" will bring you to the following window. Remember to close the single-channel screen.
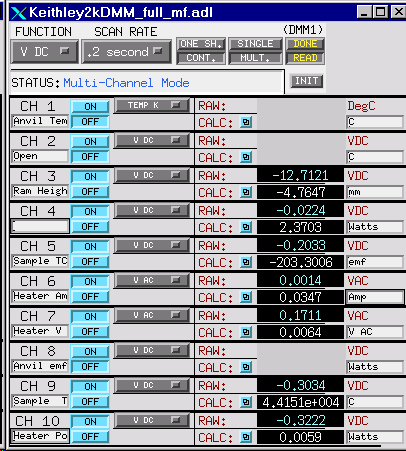
Make sure you click on the "INIT" bottom to activate the Keithley. Also make sure the "SCAN RATE" button is set at scan option (i.e., a rate is given, such as 0.1 second, 0.2 second, etc, NOT set at "EVENT" or "Passive"). Clicking on the "CALC" button next to any channel will open the calculation window (see below). You'll see that the number under "Result" gets updated every few seconds.
DAC [DAC.adl]
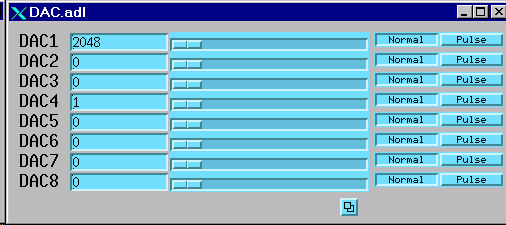
DAC controls the AC power supply by sending a DC voltage signal to the supply. The DC signal is from 0 to 10 V, corresponding to the output AC voltage from 0 to maximum (which i sset up by chossing cable setups on the supply).
1.6 Scan
Used for scanning any positioners (a motor, a compound motor, or anything that can be controlled to "move") while watching any detectors (time, intensity of the photo diode, ROIs in the MCA, or anything that can be measured).
Scan 1 [scan_more.adl]
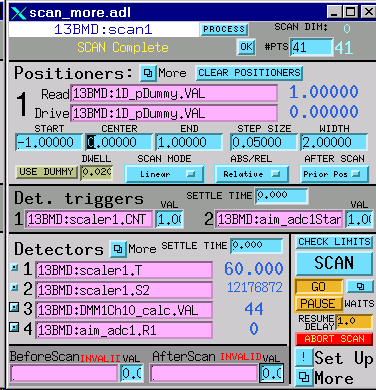
Enter the following fields:
Positioners 1 can be loaded for any positioners either by typing the positioner’s PV name, or by clicking the scan button on a Positioners Window, e.g. see for example the LVP Lift Table. Dummy positioners can be used by clicking on the "USE DUMMY" button. This allows you to perform multiple MCA data collections while watching temperature or other parameters, without moving any positioners.
2, 3, and 4 are for 2-D, 3-D, and 4-D scans
Under the positioner "More" button, there are two options.
"Positioners 1 – 4" allows you to enter up to four positioner for each scan.
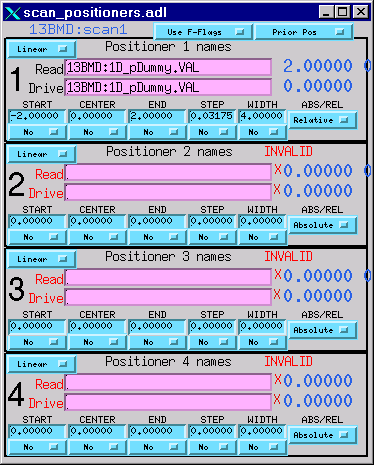
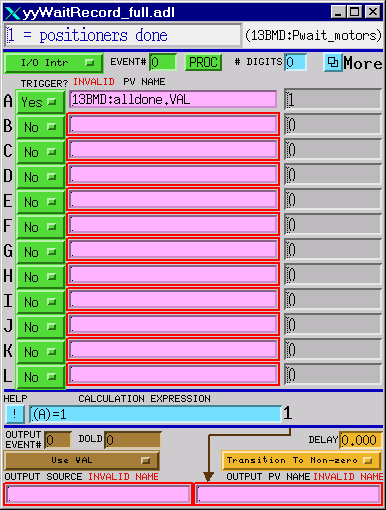
"Positioner Waits" allows you to set up positioner waits (our default is Alldone)
Det. triggers
1: 13BMD:Scaler.CNT VAL:1.0
2: 13BMD:aim_adc1Start.VAL VAL:1.0
Detectors 1: the clock (13BMD:Scaler1.T)
2: the photodiode (13BMD:Scaler1.S2)
3: temperature (in this example) 13BMD:DMM1Ch10_calc.VAL (chan. 10 of the Kiethley)
4: one ROI (again in this example) (13BMD:aim_adc1.R1)
Under "More"> "Detectors 1-15", you can enter up to 15 detectors.
Under "More"> "Detector waits", set up detector waits:
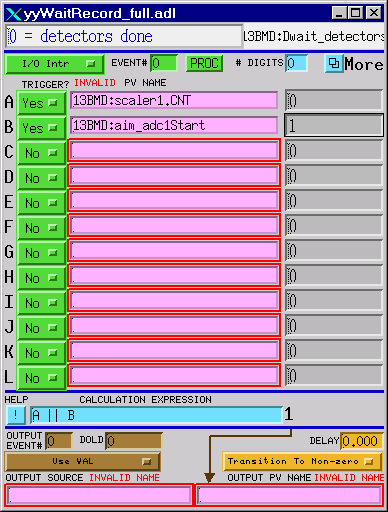
In "CALCULATION EXPRESSION", A | | B = A or B
See scan record documents in 13-BM-D LVP Operations Instruction notebook.
1.7 User Calcs, etc.
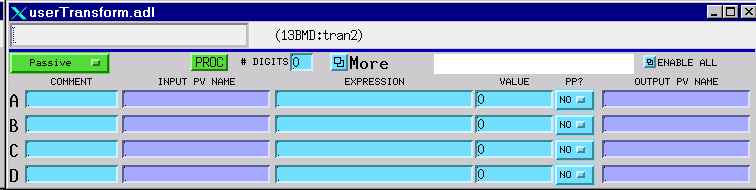
User Transform 1 [userTransform.adl]

User Transform 2 [usedrTransform.adl]
1.8 Generic RS-232 & GPIB
![]()
GPIB 1 [GPIB_IO.adl]
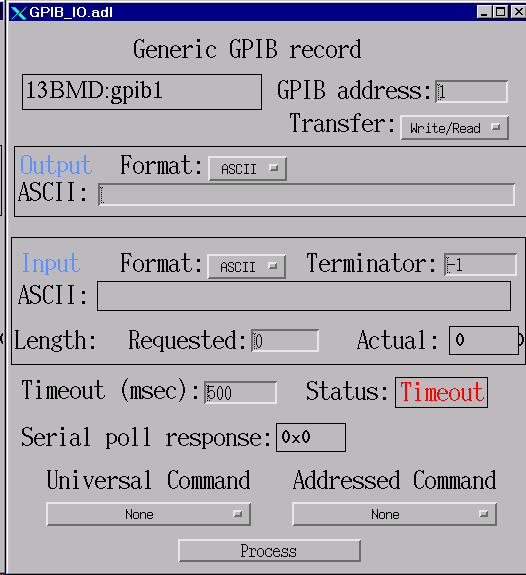
Serial 1
2. Data Catcher
lets you catch scan dataTelnet to CORVETTE using HOST ACCESS under Exceed6 on LeBaron
Log onto CORVETTE with username LVP_USER and the appropriate password. Since CORVETTE is a Unix box, all commands are case sensitive!
Enter setenv DISPLAY lebaron:0
Load IDL (idl)
Run the data catcher under IDL: IDL > catcher_v1.
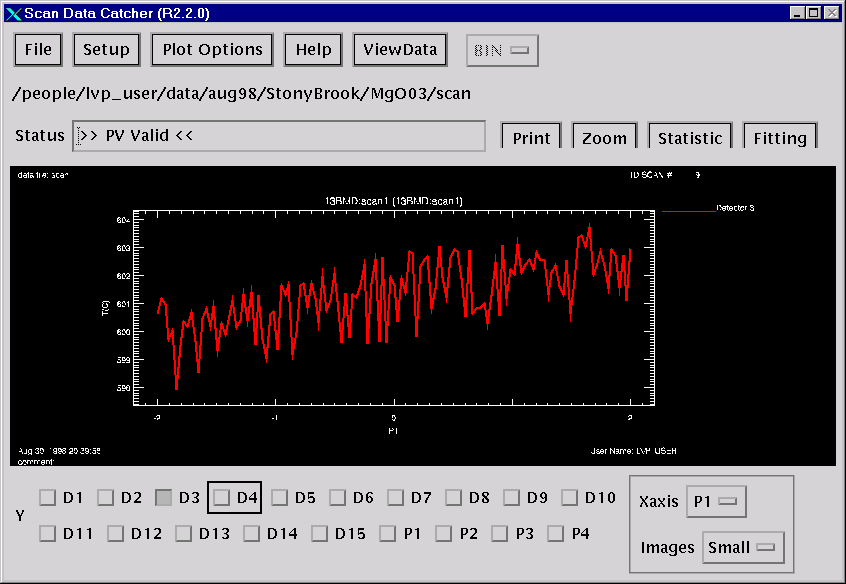
After the data catcher is loaded, run Process Variable Setup (PV Setup) by clicking on the setup button and then choose scan.
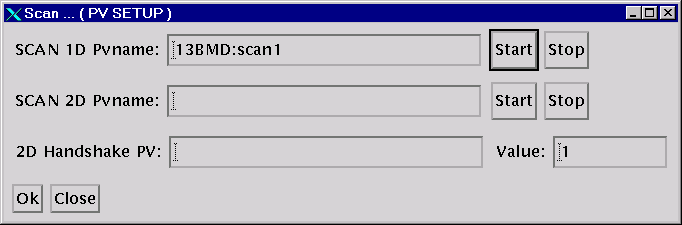
Enter 13BMD:Scan1 in the field of "SCAN 1D Pvname". For 2D scans, enter the second PV name in the field of "SCAN 2D Pvname".
Scan 2 – for 2-D scans
Scan 3 – for 3-D scans
Scan 4 – for 4-D scans
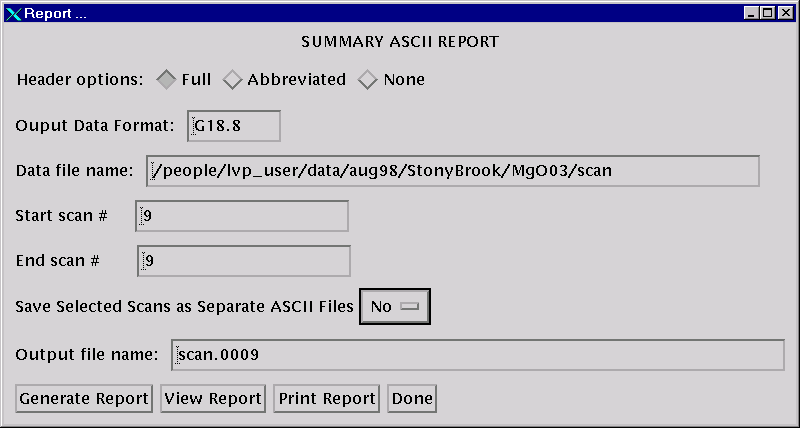
Under "Print", you may chose to print out your scan results (ASCII) to a printer or save it in a file – be sure to select the correct scan # to save.
3. MCA:
for taking spectra3.1. Open MCA
Method one: Telnet to CORVETTE using HOST ACCESS under Exceed6 on LeBaron
Log onto CORVETTE with username LVP_USER and the appropriate password. Since CORVETTE is a Unix box, all commands are case sensitive!
Enter setenv DISPLAY lebaron:0
Load IDL (idl)
Load MCA (mca)
Method two: Run directly on leBaron
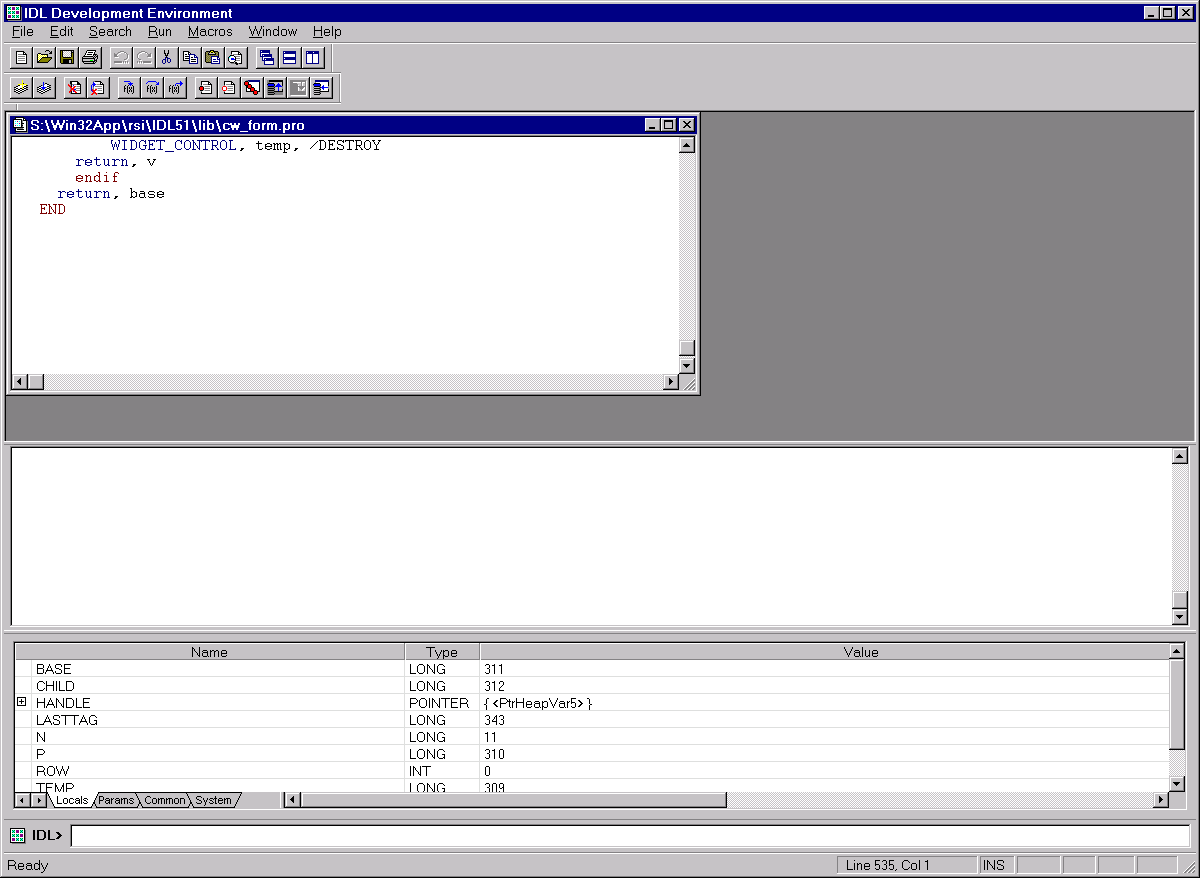
Choose Start > Programs > IDL5.1 > IDL. This will open the IDL development window:
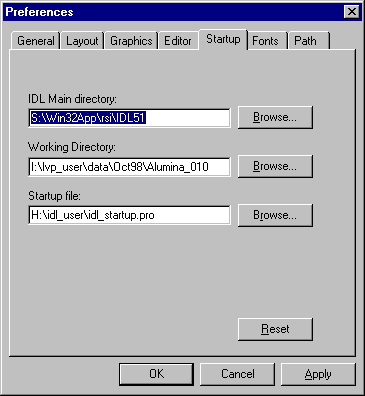
Choose File > Preferences > Startup and select Working Directory, e.g.:
Then choose Path, and add the Working Directory in the path, as shown below:
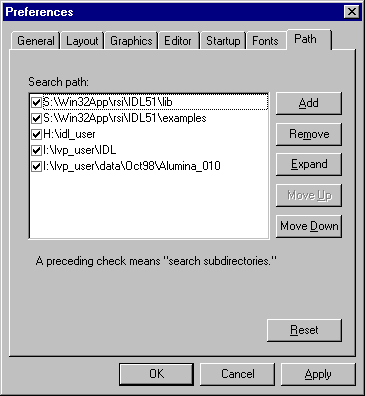
Make sure the box next to the directory is checked.
Then in the IDL prompt (last line prefixed with IDL> in the IDL development window), type IDL.
When the blank MCA window opens, open the detector by click the mouse on file:
File
> Foreground > Open detector, give detector name (13BMD:aim_adc1)

For more descriptions on the MCA, see documents in the "13-BM-D LVP Operations Instruction" manual.
3.2. File
3.3. Control
3.4. Display
3.5. Others
5. Oops, I forgot...
4.1. To Reboot the VME crate (get permission before doing this):
Telnet to CORVETTE using HOST ACCESS under Exceed6 on LeBaron
Log onto CORVETTE with username
epics and the appropriate password. Since CORVETTE is a Unix box, all commands are case sensitive!Change directory epics > R3.13.0 > CARS > iocBoot > ioc13BMD
Type 13bmd and return
type cntl/Y three times
8. Various IDL utilities.
Note: All of these can be run using the Windows version of IDL. After loading IDL, select file>preferences>Startup and change the working directory to your current directory (the one in which the files will be written, or where they are currently stored). This directory is automatically included in the IDL path, so you do not have to add it. Enter the name of the procedure in the command line, and answer the questions.
8.1 KEITHLEY
This program reads the Keithley DMM and logs the data to the screen and to a file at intervals selected by the user. Be sure to position and size the IDL window before you run Keithley, because you cannot move or resize it while it is running.
After you start the program, you are asked for a filename for the output file. You should use a name like T0056.LOG or D0056.LOG. If the file already exists in the current directory, the new data will be appended to the file.
You are then asked for a wait interval. Enter a number (normally 10). During logging, you can change the interval to any integer value from 1 to 10 by entering that key (0=10). To stop logging, press any other regular key. While logging is running, the IDL window is locked up, so you cannot modify it.
8.2 PLOTLOG_APS
This is a modification of the Plotlog program used for SAM85 data at the NSLS. It reads the log file created by Keithley, and creates 6 screen plots of the data. You can optionally also send the plots to the printer.
After you enter the log filename, the first plot appears on the screen. To go to the next plot, place the mouse cursor on the plot and press the mouse key. Continue through all the plots. When they have all been displayed, you have to answer whether or not you want a hard copy. Enter "Y", "y", "N", or "n" on the command line.
8.3 FIT_MCA_DATA
This program does a full spectrum fit to mca data. You must first create a .pks file, which is an ASCII list of peaks with a preliminary value for their energies and widths. See, for example, alumina.pks in the IDL directory of LVP_USER in Corvette.
To run, enter FIT_MCA_DATA, ‘mcadataname’, ‘peaksfilename’
An output file is created with ‘_pks’ added to the extension of the mcadataname file
Example: FIT_MCA_DATA, ‘T0067.002’, ’NACL.PKS’
These commands and filenames are NOT case-sensitive, even though they are located on Corvette.
8.4 APS2SAM
This program converts APS format data (with 5.3 filenames) to SAM format (with 8.3) filenames. You can then read these files with PLOT85, which is on Corvette (using eXcursion).
Run the program by entering APS2SAM, filespecification, where filespecification is a file name, in quotations. The filename can include wild cards, so you can use 'T0056.0*' to convert files T0056.001 through T0056.099 to T0056001.APS through T0056099.APS.